Friends, this baby poncho pattern I’m sharing today is one I couldn’t wait to try. It has everything I love in a little girl’s layer: a lacy shell yoke, softly gathered puff sleeves, and a pretty scalloped hem that sways with every tiny movement.
I found this beautiful tutorial and I’m sharing the free pattern with you here as a companion guide. The full visual walkthrough, with every count and every turn of the hook, is in the video by @Crochet_tota2, so keep it open beside you while you work.
The Baby Poncho with Puff Sleeves
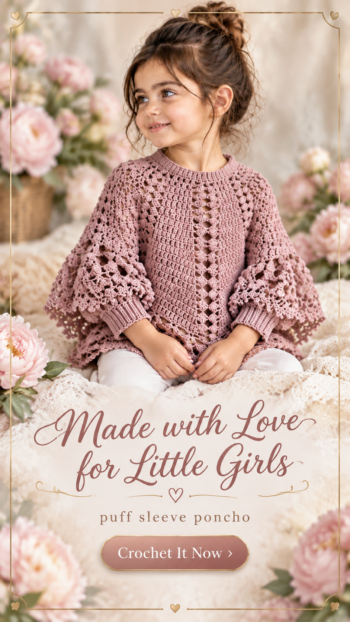
This is a top-down poncho with a difference: instead of a simple cape, it has real sleeve openings finished with snug, ribbed wristbands. Wide shells radiate out from the neckline, while larger shells mark the center front and center back, so the finished piece falls into gentle points. Below the armholes, rows of fans build into a scalloped border, and a dainty picot edge finishes both the hem and the cuffs.
The sample in the video is sized for a newborn up to about three months, but the construction is built on simple measurements, so you can size it up for a toddler or an older girl. It is a lovely gift for a baby shower, a christening, or a first winter, and it feels special without being fussy to wear.
For color, soft and classic works beautifully: blush pink with a cream picot edge, or sage, oatmeal, and ivory for a gender-neutral nursery look. For something more playful, try lavender and white, or a single-color gradient that deepens from a pale yoke to a richer hem.
Materials and Tools
The instructor recommends a light or medium-weight yarn for this design and specifically warns against thick, bulky yarns, which would weigh down the lace and hide the shell pattern. She also suggests working with a hook about 1 to 1.5 mm larger than you would normally pair with your yarn, the same trick she uses for shawls and scarves, so the fabric stays airy and drapey. For a soft baby garment, I’d reach for a DK weight cotton blend or baby acrylic with a 4.5 to 5 mm hook, but treat that as a suggestion and follow the video for the exact yarn and hook shown. You’ll also need a measuring tape, a few stitch markers, scissors, and a blunt tapestry needle (she prefers a metal one) for weaving in ends.
Stitch by Stitch
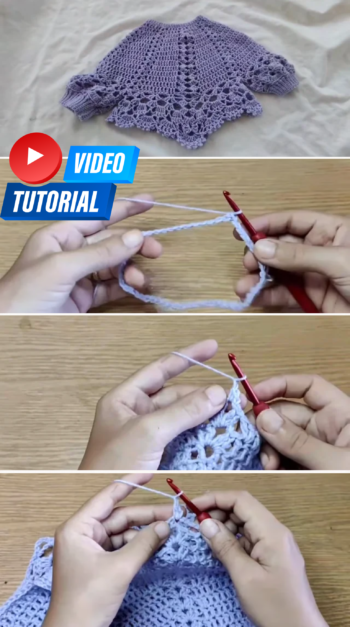
The tutorial uses a handful of familiar stitches that come together into a surprisingly rich texture:
- CH (chain) and SL ST (slip stitch) form the foundation ring at the neckline, join each round, and create the chain spaces inside the shells.
- DC (double crochet) is the workhorse of the yoke, filling the panels between shells and building the fans along the hem.
- Shell and V-stitch clusters of double crochets with chains between them create the radiating yoke, with larger shells marking the front and back points.
- SC (single crochet) and HDC (half double crochet) are used in a transition round before the sleeves and to close rounds neatly so the next one starts in the right spot.
- Back loop slip stitch ribbing and picots finish the piece: the ribbing makes the stretchy wristbands, and the picots add a delicate scalloped edge.
Once the rhythm of shells, increase rounds, and plain rounds settles in, the yoke grows quickly and becomes wonderfully calming to work.
Construction
The poncho is worked from the neckline down, in joined rounds. You start with a chain sized to the head circumference, measured on the child or taken from a size chart, then join it into a ring. The yoke is shaped by repeating a simple sequence: one increase round, where you add stitches at the edges of each double crochet panel, followed by two even rounds. Stitch markers on two opposite shells divide the work into front and back, and those marked shells are worked larger so the poncho falls into soft points. The instructor suggests continuing until the yoke measures about one and a half to two times the chest circumference.
Next, a transition round of single crochet sets up the stitch count for the armholes. Each sleeve is worked separately in the round with shells, fans, and a picot edge, then a sideways back loop slip stitch band is added and joined to form the cuff. Finally, you rejoin the yarn to work the body in shells and fans down to your chosen length and finish with picots. You can make the sleeve openings wider or narrower, choose how puffy the sleeves are, and use hdc instead of dc in the picot round for a shorter, firmer edge. Follow the full video tutorial for exact counts and the complete pattern.
Beginner Tips
Measure your chain flat. Before joining the foundation ring, lay the chain on a flat surface and straighten it gently without stretching. The instructor adds a little extra ease if you like, but no more than about 10 cm.
Mark your shells and count each panel. The most common mistake in this pattern is working into the double crochets of a shell instead of into the panel between shells. Place markers on the opposite shells, recount the panels after each increase round, and the yoke will stay symmetrical.
Fix your stitch count before the sleeves. The armhole round needs a specific multiple, so if your count falls short, add the missing stitches gradually across the single crochet round rather than squeezing them into one spot. The instructor prefers adding stitches to taking them away.
Wearing Your Baby Poncho
Slip it over a simple onesie or a cotton dress for a sweet photo-ready look, or layer it over a long-sleeved bodysuit on cool spring days. Because the sleeves are built in, the poncho stays put while little arms wave and reach, so it is as practical for stroller walks as it is pretty for family celebrations.
Keeping Your Baby Poncho Soft and Lovely
Baby things get washed often, so choose a machine-washable yarn if you can. Hand wash or use a gentle cycle in cool water with a mild detergent, then press out the water in a towel instead of wringing. Lay the poncho flat to dry, gently pinning the points and scalloped hem into shape, and open the picots with your fingers. Store it folded rather than hung so the lace yoke doesn’t stretch.
Closing: A Personal Invitation
There is something deeply tender about crocheting for a new baby. Every shell and every picot carries a little of your time and care, and a handmade poncho like this one often becomes a keepsake long after it has been outgrown.
If you enjoyed this project, take a look at my other free crochet patterns:
Related Posts


And if you’re just starting out, visit the Guides section, where I’ve collected helpful articles about crochet basics and techniques: Beginner’s Guide to Crochet: Basic Crochet Techniques, Crochet Abbreviations and Terms for Beginners, and Specialty & Complex Crochet Stitches.
Save this Baby Poncho to your Pinterest crochet board so you can come back to it whenever you are ready to start.
Follow us on Pinterest and subscribe to the Newsletter so you don’t miss a thing!
Tutorial and photos of this baby poncho by: @Crochet_tota2.
Little Treasures for Your Hook
Classic Black Beanie Crochet Pattern | 7 Sizes Newborn to Adult | Easy
Crochet Flower Booties Pattern | Baby Shoes 0-12 Months | 4 Sizes
Flower Hat Crochet Pattern | 7 Sizes Newborn to Adult | Pink & Gray
Ladybug Baby Booties Crochet Pattern | 4 Sizes 0-12 Months | Easy Photo Tutorial