I found the most beautiful tutorial for a crochet baby dress, and I’m sharing it with you today. There’s something so special about creating tiny garments—each stitch feels like a little act of love, and the finished piece is always worth the effort. This particular design, shared by Lar da Vana, has the sweetest empire waist and a skirt that flares into gentle ruffles, perfect for a little one’s special day.
The full visual walkthrough is in the video by Lar da Vana, and I’ll walk you through the highlights here so you can see if this project is the right fit for your hook.
The Baby Dress
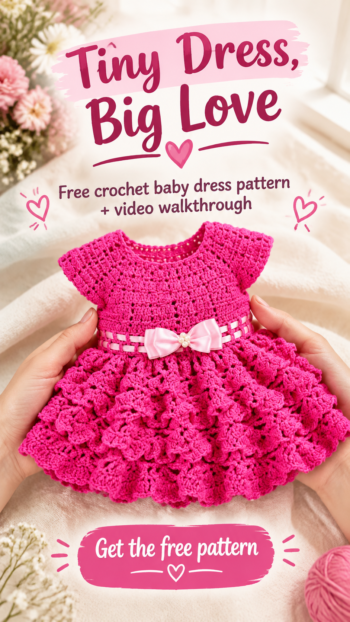
Picture a tiny dress with a fitted bodice that gives way to a softly flared skirt, finished with delicate ruffled layers that move like butterfly wings. The design shown in the tutorial is worked in a lovely shade of pink—a vibrant yet tender rosa pink, specifically Charme yarn in color 3754. The stitch pattern creates a textured surface of double crochet clusters separated by chain spaces, giving the fabric a pleasant density that holds its shape while still draping beautifully.
This dress is intended for a six-month-old baby, though the concept is wonderfully adaptable. The empire waist sits high, creating that classic sweet silhouette that works so well for little ones. The skirt features a repeating shell pattern that creates natural waves and a gentle ruffle effect at the hem. It’s the kind of project that looks intricate but is built on simple, repeating motifs.
For color variations, the pink shown in the video is absolutely charming, but I can also imagine this dress in soft ivory for a christening, a gentle sage green for a spring baby, or even a classic navy and white combination for a more tailored look. A single-color gradient from blush to deeper rose would also be stunning.
Materials and Tools
The instructor used Charme yarn in the rosa pink shade 3754, and she notes that one skein plus a little more was enough for the six-month size. For the hook, a 2 mm size was used, which creates a fine, delicate fabric appropriate for baby garments. You’ll also want thin ribbon for threading through the waist and a wider ribbon for the bow at the front—the instructor used two different widths to create that layered look. Small pearl beads add a sweet finishing touch at the center of the bow, and you’ll need a small button or two for the back closure. If you can’t find pearls, a little sparkly embellishment works just as well. For a similar result, I’d recommend choosing a smooth, soft yarn that feels gentle against delicate skin—cotton blends or acrylic baby yarns both work beautifully. Follow the video for exact yardage and any specific notions the instructor mentions.
Stitch by Stitch
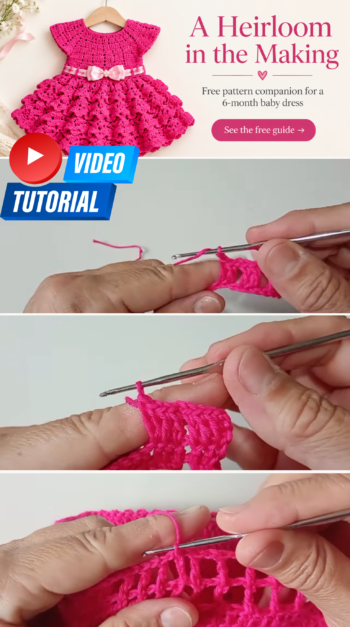
This dress uses a handful of foundational techniques that create its distinctive texture:
-
CH (chain) — used throughout to create the foundation and the spaces between double crochet clusters, forming the airy lattice that defines the pattern.
-
DC (double crochet) — the primary stitch, worked in clusters of two or three to create the textured blocks that make up the bodice and skirt.
-
DC2tog (double crochet two together) — used in the skirt section to create gentle decreases that shape the ruffle.
-
Sl st (slip stitch) — joins rounds and moves the yarn across to begin new sections.
-
Shell stitch pattern — a combination of double crochets separated by chain spaces, creating the fan-like motifs that give the skirt its wave.
The rhythm of this project is deeply satisfying—once you understand the repeating clusters and spaces, your hook finds its own tempo, and the dress seems to grow almost on its own.
Construction
The dress is worked from the top down in stages. The instructor begins with a foundation chain of 80, then works the first row in double crochet clusters separated by single chains. The bodice grows through alternating increase rows and straight rows until nine rows are complete, creating a rectangular piece that will become the yoke.
Markers are then placed to divide the work into sections for the back, sleeves, and front. The underarm openings are created by working chain spaces that skip over the sleeve sections, joining the front and back into a continuous round. The skirt is then worked downward in a repeating shell pattern, with the instructor choosing to complete five pattern repeats rather than six to keep the proportions right for a six-month size.
The passafita—the ribbon casing—is created with a row of double crochet stitches separated by chain spaces, allowing ribbon to thread through. The instructor added two of these casings for extra charm. The ruffled hem is worked as a final decorative layer, with the shell pattern creating natural waves. Follow the full video tutorial for exact counts and complete pattern.
Beginner Tips
Use stitch markers generously. The instructor places markers to divide the yoke into sections before creating the armholes. This is especially helpful for beginners—marking your sections before you work them means you can crochet with confidence, knowing exactly where each part begins and ends.
Don’t skip the math on your clusters. The pattern relies on consistent counting of double crochet clusters and chain spaces. Before moving to the next row, take a moment to verify your count matches what the instructor shows. This small habit prevents the heartbreak of discovering an error several rows later.
Practice your shell stitch on a swatch first. The skirt’s shell pattern is simple once you understand it, but working a small practice piece will help you get comfortable with the rhythm of creating those fan-like motifs before you commit to the full skirt.
Wearing Your Baby Dress
This little dress is made for twirling—or at least for the baby version of twirling, which is mostly kicking delighted feet. It’s perfect for a first birthday photo session, a family gathering, or simply a Tuesday when you want to dress your little one in something handmade and meaningful. The empire waist is comfortable for sitting and crawling, and the soft yarn feels gentle against the skin. Pair it with tiny white socks and a matching headband, or let the pink bow be the star of the show.
Keeping Your Baby Dress Looking Its Best
Hand wash this dress gently in cool water with a mild detergent, then roll it in a towel to remove excess water before laying it flat to dry. Avoid wringing or hanging, which can stretch the delicate fabric out of shape. If the skirt ruffles seem flattened after washing, a light steam from your iron (held a few inches away) will help them bounce back. Store the dress folded in a drawer or hung on a padded hanger, and keep the ribbon and bow gently arranged so they don’t crease. With a little care, this dress will be ready to pass down to a younger sibling or become a treasured keepsake.
Closing: A Personal Invitation
There’s something quietly profound about making tiny clothes—each stitch holds the hope of happy moments, of chubby hands and proud first steps. Even if you’re new to garment construction, this project is a lovely way to practice shaping and stitch patterns on a small, forgiving scale.
If you enjoyed this project, take a look at my other free crochet patterns: {{OTHER_PATTERN_ARTICLES}}. And if you’re just starting out, visit the Guides section, where I’ve collected helpful articles about crochet basics and techniques: {{GUIDES_ARTICLES}}.
Save this baby dress to your Pinterest crochet board so you can come back to it whenever you are ready to start. Follow us on Pinterest and subscribe to the Newsletter so you don’t miss a thing!
Tutorial and photos of this baby dress by: Lar da Vana.