Friends, this baby onesie pattern I’m sharing today is one I couldn’t wait to try. I found this beautiful tutorial and fell for its soft, bumpy texture right away, the kind of fabric that makes you want to reach out and touch it. It’s worked in sizes from newborn up to 12 months, and the hood is completely optional.
The full visual walkthrough is in the video by Simona Crochet. This first part takes you from the very first chain all the way through the yoke, the body, and the front button band, so by the end you’ll be holding something that already looks like a tiny garment.
The Baby Onesie
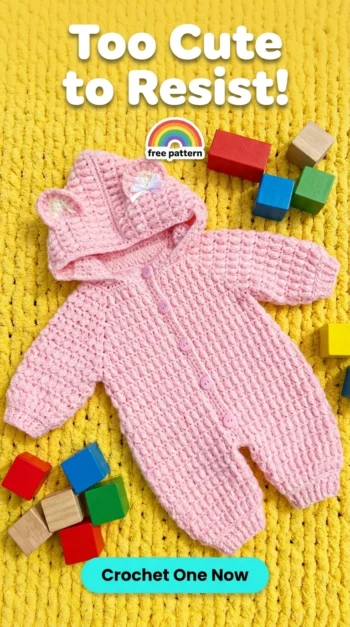
This onesie is a one-piece bodysuit with a buttoned front, a gently raised back neckline, and a thick, plush stitch pattern that feels warm without being stiff. The surface alternates rows of plain double crochet with rows of front post puff stitches and half double crochets, so the little puffs line up in neat vertical columns. The result is a fabric with a soft, quilted feel and lovely definition.
It’s made for babies from 0 to 12 months, and because the instructor works from measurements rather than rigid counts, you can tailor the fit to the little one you’re making it for. The tutorial shows three finished samples: a smallest size without a hood, a 3–6 month version with a hood and sweet added ears, and a larger 6–9 month version. It’s a wonderful baby shower gift, a coming-home outfit, or a cozy layer for cool days.
The video features a fresh light green and a warm mustard, both lovely gender-neutral choices. For other palettes, try sage, cream, and dusty rose for a soft, vintage mood, or classic navy with white buttons for a crisp, sailor-inspired look. Oatmeal or a pale lavender would also show off the puff texture beautifully.
Materials and Tools
The instructor uses a light weight (category 3) 100% acrylic yarn with roughly 300 meters per 100 grams, paired with a 4 mm hook. Any fiber works as long as you match the weight, since the pattern starts on a set number of chains and a much thicker or thinner yarn will throw off the neckline. Plan on about 250 grams for the two smallest sizes, and a little more (between 250 and 300 grams) for the larger sizes, especially if you add the hood. You’ll also need scissors, around ten stitch markers (six are essential, the rest are handy extras for beginners), a yarn needle for weaving in tails, a smaller needle for sewing on buttons, a measuring tape in centimeters to follow the size chart, and five or six buttons, depending on the size. If you have a choice, I’d reach for a soft, machine-washable yarn that feels gentle against baby skin.
Stitch by Stitch
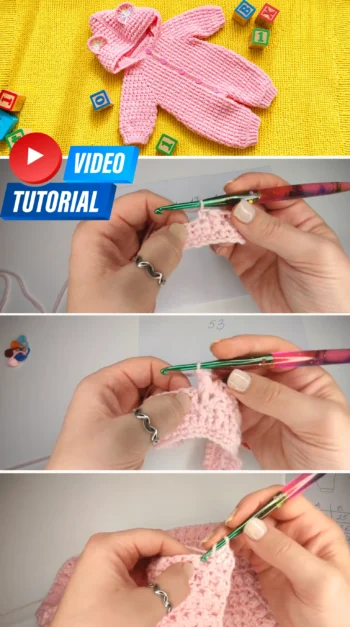
The stitch vocabulary here is short and friendly, but the way it comes together makes all the difference.
- CH (chain) builds the foundation for the neckline and creates the underarm chains when the body is joined.
- SC (single crochet) forms the neat neckline row and the front button band, worked in three tidy rows along each edge.
- HDC (half double crochet) sits between the puffs in the pattern row and helps transition from shorter to taller stitches when shaping the back.
- DC (double crochet) makes up every other row, along with the “dc, ch 1, dc” corners that shape the yoke.
- FP puff stitch (front post puff stitch) is the star of the show, worked around the post of the double crochet below to create that plump, bumpy texture.
Once the two repeat rows click into place, the work settles into a calm, soothing rhythm that’s a real pleasure to follow.
Construction
The onesie is worked from the top down, starting at the neckline and growing outward. After a foundation row of single crochet and a couple of setup rows, stitch markers divide the work into front, sleeve, and back sections. A few carefully shaped rows add taller stitches across the back, so the back neckline sits higher than the front for a more comfortable fit. From there, you simply alternate the double crochet row and the puff stitch row, increasing at four corners until the yoke reaches the length on the size chart.
At that point, the sleeve sections are set aside, the front and back are joined with a few underarm chains, and the body continues in rows with gentle increases at the sides for extra room at the bottom. Once the body reaches the target length, single crochet bands are worked along both front edges, with buttonholes on one side, and the bottom of the bands is joined to the center back. Legs, sleeves, and the optional hood come in Part 2. Follow the full video tutorial for exact counts and the complete pattern.
Beginner Tips
Measure your first row. The neckline row should land within the range given in the video. If yours comes out much longer, start over with a smaller hook for the neckline before the main pattern begins, so the collar isn’t too wide.
Never skip the corner stitches. Always work into the last stitch before each chain-1 corner and into the turning chain at the end of the row. Missing even one stitch throws off the puff stitch alignment. A good check: the stitch right before every corner in the puff row should always be a puff stitch.
End on a puff stitch row. Before joining the body and before finishing the length, make sure your last row is a puff stitch row. It’s slightly tighter and more accurate for measuring, and it sets up the next stages correctly. Being a little over the measurement is fine; a baby garment is always better a bit roomy than snug.
Using Your Baby Onesie
This onesie is made for real life: snuggled into a car seat on the way home from the hospital, layered for a stroll on a crisp autumn day, or tucked into a gift box with a handwritten note. The buttoned front makes dressing simple, and the hooded version adds extra warmth for chilly afternoons. In a soft neutral, it photographs beautifully for newborn and milestone pictures, too.
Keeping Your Baby Onesie Soft and Snuggly
Because it’s made with acrylic yarn, this onesie can usually go in the washing machine on a gentle cycle in a mesh laundry bag, but always check your yarn label first. Use a mild, baby-safe detergent and skip the fabric softener so the puff texture stays crisp. Lay it flat to dry, gently patting the yoke and button bands into shape, and avoid hanging it, which can stretch the body. Check the buttons regularly to make sure they’re securely sewn on, and store it folded in a drawer rather than on a hanger.
Closing: A Personal Invitation
There’s something truly special about making a first garment for a little one. Every puff and every button is a small act of love, and a handmade onesie like this one often becomes a keepsake long after it’s outgrown.
If you enjoyed this project, take a look at my other free crochet patterns:
Related Posts
And if you’re just starting out, visit the Guides section, where I’ve collected helpful articles about crochet basics and techniques: Beginner’s Guide to Crochet: Basic Crochet Techniques, Crochet Abbreviations and Terms for Beginners, and Specialty & Complex Crochet Stitches. Save this Baby Onesie to your Pinterest crochet board so you can come back to it whenever you are ready to start. Follow us on Pinterest and subscribe to the Newsletter so you don’t miss a thing!
Tutorial and photos of this baby onesie by: Simona Crochet.
Your Next Project Starts Here
Crochet Flower Booties Pattern | Baby Shoes 0-12 Months | 4 Sizes
Hello Kitty Beanie Hat Crochet Pattern | 7 Sizes Newborn to Adult | Easy
Puff Stitch Baby Booties Crochet Pattern | Boy/Girl 4 Sizes 0-12 Months
Strawberry Hat Crochet Pattern | 7 Sizes Newborn to Adult | Leaf & Flower Topper