Friends, this little paw coaster is one I couldn’t wait to share with you. The moment I saw those chubby toe beans sitting under a mug of tea, I knew it belonged on every pet lover’s table. It’s a quick, joyful make, and once you finish one, you’ll want a whole litter of them.
Today I’m sharing the free pattern overview for this cat and dog paw coaster, and the full visual walkthrough is in the video by AmiaMikancl Crochet. Grab two colors you love and let’s take a closer look.
The Paw Coaster
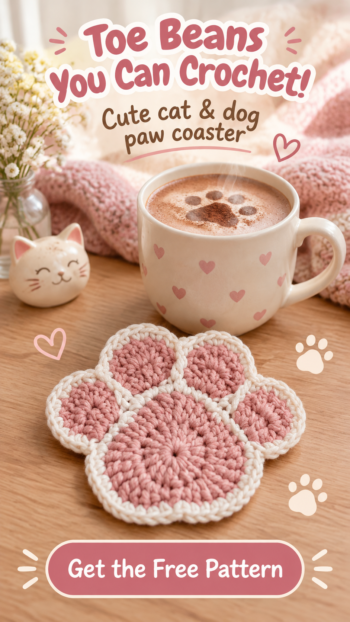
This coaster is shaped like a soft, rounded paw print: one plump main pad at the bottom and four little toe beans fanned across the top. Each section is outlined in a contrasting color, so the shape reads clearly from across the room and the edges feel neat and finished. The fabric is dense and slightly cushioned, built from tall stitches in the pad and a firm single crochet border that holds everything flat.
It’s the kind of project that makes people smile. Make a set for your own coffee table, tuck one into a gift bag for a friend who just adopted a kitten, or sell them at a craft fair next to pet-themed treats. Because it works up quickly and uses only small amounts of yarn, it’s also a lovely stash-buster.
The video shows a sweet pink paw with a contrasting outline, but the color play is where this design really shines. Try soft pink pads with a cream border for a classic kitty look, chocolate brown with a caramel outline for a puppy-inspired version, or black with a white border for a crisp, modern graphic feel. For a calming kitchen palette, sage green and oatmeal pair beautifully, and a set in pastel lavender, mint, and butter yellow would look adorable stacked together.
Materials and Tools
The tutorial keeps the supply list wonderfully simple: yarn in two colors of your choice (one for the pad and toes, one for the outline), a pair of scissors, a tapestry needle for weaving in ends, and a crochet hook that suits your yarn. The instructor works with a 3.5 mm hook (a Japanese size 6/0) and a Korean yarn called Lamb’s Wool Maison, and also shows a sample made with Daiso’s budget-friendly “Amigurumi” yarn, which proves this design works with whatever you have on hand. If you’re shopping fresh, I’d reach for a smooth cotton or cotton-blend in a light worsted or DK weight, since cotton is absorbent and holds its shape under a warm mug. Follow the video for the exact yarn and hook details if you want to match the original size.
Stitch by Stitch
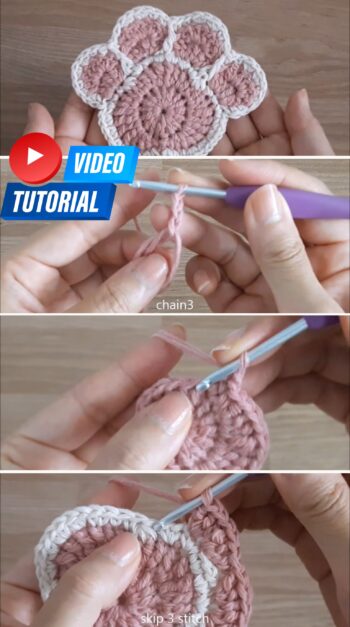
This little motif is a friendly sampler of basic stitches, each one doing a specific job in the shape.
- Magic ring starts the main pad, letting you pull the center closed tightly so there’s no hole in the middle of your coaster.
- DC (double crochet) forms the round base of the pad and the clustered groups that become the four toes.
- SC, HDC, and TR (single, half double, and treble crochet) are combined in the second round so the stitches grow taller and shorter, sculpting the pad’s soft rounded-triangle shape.
- SC3tog (single crochet three together) appears in the contrasting border, drawing in the edge where the pad dips so the outline hugs the curve.
- Long dc worked into the border below is used between the toes, pulling the outline down to define each toe bean cleanly.
Once you find the rhythm of increasing and decreasing around the curves, the work becomes calm and satisfying, and you’ll see the paw take shape with every round.
Construction
The coaster is built in four simple stages. First, you work the main pad in the round from a magic ring, using a mix of short and tall stitches to shape it, then fasten off. Next, you join the border color and work single crochet all the way around, adding increases along the curves and decreases where the edge needs to pull in. The tutorial also shows how to crochet over the yarn tails as you go, which saves a lot of weaving later.
For the toes, you switch back to the main color and join along the top of the bordered pad. Groups of double crochet are worked across, skipping stitches between them, and then you turn and work another row of clusters, anchoring them with slip stitches into the spaces between groups. This creates four separate toe beans. Finally, the border color goes around the toes, with long stitches dropped down between each toe to separate them. Follow the full video tutorial for exact counts and complete pattern, as the stitch placement around the curves matters for a balanced shape.
Beginner Tips
Pull the magic ring closed in two steps. The instructor wraps the yarn twice to make the ring, then tugs the tail and the shrunken inner loop in turn. Taking a moment here gives you a tight, hole-free center that looks polished.
Flip the work to see your stitches. When you’re bordering the toes, the double crochet clusters can face backward and their tops are hard to read. Turning the piece over to check the front makes it much easier to find the right stitch.
Crochet over your tails as you go. Lay the yarn tail along the top of the stitches and work over it each time you join a new color. Your coaster will be nearly finished when you fasten off, with only a couple of ends left to weave in using your tapestry needle.
Using Your Paw Coaster
Set one under your morning coffee, scatter a few across a party table, or slip a pair into a basket with a mug and some tea for an easy, heartfelt gift. These paws also make charming appliqués for tote bags, blankets, and pet beds, a sweet little pocket decoration, or a keepsake for anyone missing a furry friend.
Keeping Your Paw Coaster Looking Its Best
Hand wash your coaster in cool water with a gentle detergent, especially if you’ve used wool or a wool blend, and avoid wringing it. Press out the water in a towel, then lay it flat and gently nudge the toes and pad back into shape to dry. A light steam block will smooth any curling edges. Cotton versions can handle a delicate machine cycle in a laundry bag. Store your coasters flat in a stack so they keep their crisp outline.
Closing: A Personal Invitation
There’s something so special about a handmade piece that brings a little joy to everyday moments. Every time you set your cup down on a soft crocheted paw, you’ll be reminded that small things made with care truly matter.
If you enjoyed this project, take a look at my other free crochet patterns:
Related Posts

And if you’re just starting out, visit the Guides section, where I’ve collected helpful articles about crochet basics and techniques: Beginner’s Guide to Crochet: Basic Crochet Techniques, 6 Basic Stitches in Crochet, and Troubleshooting Common Crochet Issues.
Save this Paw Coaster to your Pinterest crochet board so you can come back to it whenever you are ready to start.
Follow us on Pinterest and subscribe to the Newsletter so you don’t miss a thing!
Tutorial and photos of this paw coaster by: AmiaMikancl Crochet.
Ready for Your Next Happy Project?
Crochet Strappy Sandals Pattern | Baby Shoes 0-12 Months | 4 Sizes
Hello Kitty Baby Booties Crochet Pattern | 4 Sizes 0-12 Months | Bow & Ears
Ladybug Baby Booties Crochet Pattern | 4 Sizes 0-12 Months | Easy Photo Tutorial
Strawberry Baby Booties Crochet Pattern | 4 Sizes 0-12 Months | Fruit Set