Friends, this daisy flower bag pattern I’m sharing today is one I couldn’t wait to try. It’s small, cheerful, and looks exactly like a fresh daisy picked from the garden, with a playful chain-link handle and a little green bow tied at the side.
I found this beautiful tutorial and I’m happy to share the free pattern with you. The full visual walkthrough is in the video by MIMI Handmade, so you can follow every step at your own pace.
The Daisy Flower Bag
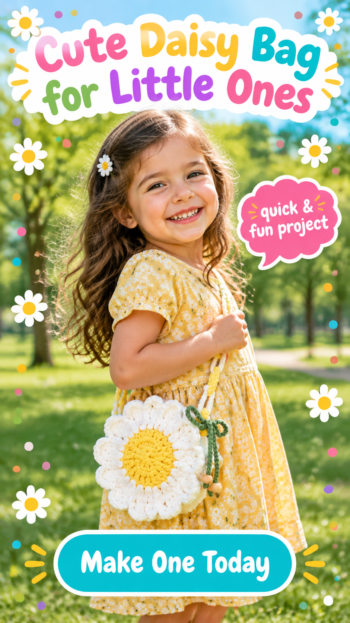
Each side of this bag is a round daisy motif: a sunny yellow center surrounded by a ring of white, scalloped petals. A row of front post stitches gives the petals raised, textured veins, so the flower almost seems to lift off the fabric. Two of these motifs are joined with a white side band, creating a soft, rounded little pouch that’s about 14 cm (roughly 5.5 inches) wide.
The handle is the real surprise. Instead of a plain strap, the instructor makes a chain of small crocheted links in alternating yellow and white, looped together like a necklace. A forest-green bow with two wooden beads adds a sweet, almost “princess-like” accent. It’s a lovely project for anyone who enjoys quick, giftable accessories, and a delightful little bag for a child, a teen, or anyone who loves flowers.
For color variations, you can stay with the classic yellow, white, and green shown in the video, or try a pastel twist with a peach center, cream petals, and a sage bow. A lavender center with white petals and a lilac ribbon feels soft and romantic, while a terracotta center with oatmeal petals and an olive bow gives the bag an earthy, boho mood.
Materials and Tools
The tutorial uses a milk cotton yarn in 125 g balls, in yellow and white, and the yarn is held double throughout the bag body. The instructor shares a handy trick for this: pull one strand from the center of the ball and one from the outside, so you don’t need two separate balls. A 4 mm hook is used for the bag, along with scissors and a yarn needle for joining and weaving in ends. For the bow, you’ll need a small amount of green yarn (a 50 g ball is shown), a 3 mm hook, and two wooden beads. A circle of fabric is optional if you’d like to sew in a lining. If you want a larger bag, the video suggests keeping the same stitch counts and switching to a velvet (chenille-style) yarn, or using a thicker yarn with a larger hook. Follow the video for exact counts and specifics.
Stitch by Stitch
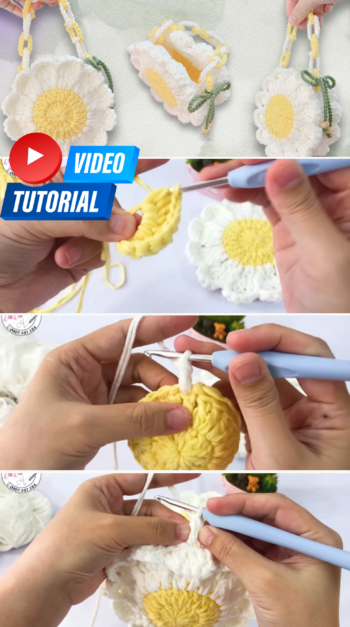
This bag relies on a handful of familiar stitches, combined in a clever way:
- Magic ring starts the yellow flower center, worked with double crochet and pulled snug.
- DC (double crochet) is the main stitch of the bag, used for the increase rounds, the petals, and the side band. The instructor also shows a chainless standing double crochet to start rounds neatly instead of a ch 3.
- FPdc (front post double crochet) creates the raised lines that separate and define each petal.
- Working in one loop only on the petal round leaves the other loop free for joining the two halves and the side band later.
- Ch (chain) and sl st (slip stitch) shape the petal tips and finish each round. For the handle, a short chain is worked back with simple stitches and closed into a link.
Once the rhythm of the petals clicks, each repeat flows into the next, and watching the daisy bloom round by round is truly satisfying.
Construction
The bag is worked in the round, from the center outward. You begin with the yellow center and its increase round, then switch to white for the increase and post-stitch rounds, and finish with a petal round worked into only one loop. You make two identical daisy motifs. Next, a white band of double crochet is worked along the free loops of one motif to give the bag its depth, leaving the top section open as the bag’s mouth. The second motif is then sewn to the band with a yarn needle, matching stitch to stitch. The video also notes that you can work fewer stitches in the band if you’d like a wider opening.
For the handle, small chain links are made one by one, each looped through the previous link before closing, alternating colors as you go. The length is entirely up to you: keep it short for a handheld bag, or refer to the long strap from the instructor’s sunflower bag tutorial for a crossbody version. Finally, a long green chain is threaded with wooden beads and tied into a bow on one of the links. Follow the full video tutorial for exact counts and complete pattern.
Beginner Tips
Shape as you go. The instructor flattens and straightens the work after each round. Tight stitches can make the circle cup or curl, so gently stretch it flat before moving on, and relax your tension if the rounds keep pulling inward.
Find the right loop. On the petal round, it’s easy to lose the stitch you need, especially near the post stitches. Take a moment to spread the fabric and identify the correct loop before inserting your hook, and keep the unworked loops neat for joining.
Simplify when needed. If the chainless standing double crochet feels tricky, the video says you can simply chain 3 instead. When joining new colors, work over the yarn tails as you go so there’s less to weave in at the end.
Using Your Daisy Flower Bag
This little bag is perfect for carrying the essentials: keys, lip balm, earbuds, or a few coins for the farmers’ market. Hang it from your wrist on a summer stroll, pair it with a sundress for a picnic, or give it to a little one who adores flowers. It also makes a charming handmade gift tucked into a birthday basket.
Keeping Your Daisy Bag Fresh and Bright
Since milk cotton is soft and slightly delicate, hand wash your bag in cool water with a mild detergent, and avoid wringing or twisting it. Gently press out the water, then lay it flat on a towel, reshaping the petals and the rounded body while damp. Let it air dry away from direct sunlight to keep the yellow and green vibrant. When storing, stuff the bag lightly with tissue paper so it keeps its plump shape, and lay the chain handle flat to prevent tangling.
Closing: A Personal Invitation
I love how a few balls of cotton and a little patience can turn into something this joyful. Handmade pieces like this one carry a little sunshine with them, and every time you reach for your daisy bag, you’ll remember the rounds you worked to make it bloom.
If you enjoyed this project, take a look at my other free crochet patterns: {{OTHER_PATTERN_ARTICLES}}. And if you’re just starting out, visit the Guides section, where I’ve collected helpful articles about crochet basics and techniques: Beginner’s Guide to Crochet: Basic Crochet Techniques, 6 Basic Stitches in Crochet, and Troubleshooting Common Crochet Issues.
Save this Daisy Flower Bag to your Pinterest crochet board so you can come back to it whenever you are ready to start.
Follow us on Pinterest and subscribe to the Newsletter so you don’t miss a thing!
Tutorial and photos of this daisy flower bag by: MIMI Handmade.