Friends, today I want to share something truly special with you—a crochet star baby sleeping bag that has completely captured my heart. When I came across this tutorial from Craft & Crochet, I knew I had to tell you about it. There’s something so deeply satisfying about creating something soft and cozy for a little one, and this design delivers all the warmth and whimsy you could hope for. The full visual walkthrough is available in the video by Craft & Crochet, and I’m here to give you the broader picture so you can decide if this is your next project.
The Star Sleeping Bag
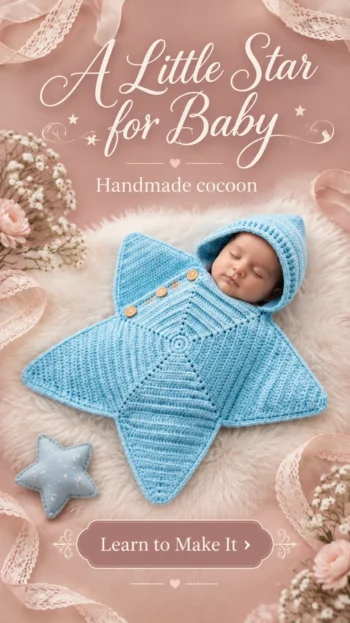
Picture a star-shaped cocoon that cradles a baby like a gentle hug. The finished piece has five soft points that fan out from a central star motif, creating a shape that’s both practical and utterly charming. The fabric is worked in double crochet rounds that build outward from the middle, giving it a lovely dense texture that holds its shape while still feeling pliable and snuggly against delicate skin.
What makes this design so appealing is its versatility. The tutorial shows how the same project can serve as a baby cocoon for those precious newborn photo sessions, a sleeping bag for chilly nights, or even a sweet star blanket when laid flat. The instructor demonstrates three sizes—newborn, 0–3 months, and 3–6 months—so you can make the perfect fit for the little one in your life or create a set for a growing baby.
The color possibilities here are endless, and the tutorial uses a soft medium blue that feels calm and classic. I’d also love to see this worked in sage green with cream accents for a nature-inspired nursery, or in dusty rose and soft gray for something gently feminine. A single-color gradient from pale yellow to warm gold would be absolutely dreamy for a star-themed nursery. The instructor even mentions that a contrasting white border adds a lovely finishing touch if you want to add visual interest without changing the main color.
Materials and Tools
The tutorial specifies a 4 mm crochet hook and double knitting yarn for all three sizes, with the 0–3 month size requiring approximately two balls of yarn at 100 grams and 330 meters each. The instructor notes that the 3–6 month size will need a bit more yarn, so plan accordingly if you’re making the larger version. You’ll also want a tapestry needle for weaving in ends, scissors, and a measuring tape to check your dimensions as you work. The design uses three small buttons for the sleeve closure, and the instructor recommends choosing buttons around 2 cm in size that can pass easily through the crochet stitches without needing dedicated buttonholes. If you’re using a different yarn weight, I’d suggest swatching first to ensure your star maintains its shape and the fabric doesn’t become too loose or too stiff—the video provides exact yardage and gauge guidance if you need it.
Stitch by Stitch
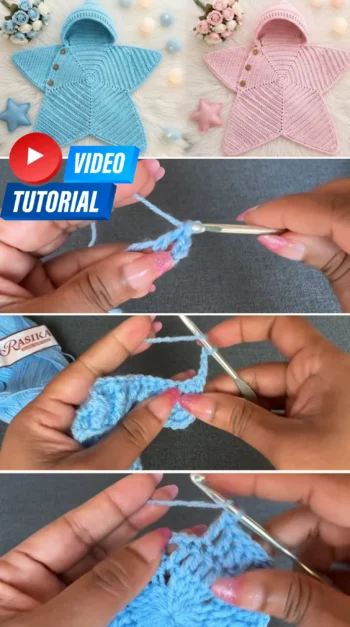
The tutorial walks through each technique with clear demonstrations, making this accessible even if you’re newer to crochet:
-
DC (double crochet) forms the main fabric of the star, creating a dense, cozy texture that works up quickly and holds its shape beautifully.
-
DC2tog (double crochet two together) shapes the star points and creates the gentle decreases that transform the flat star into a three-dimensional sleeping bag.
-
FPdc and BPdc (front post and back post double crochet) create the textured ribbing on the hat section, giving it a stretchy, comfortable fit around the baby’s head.
-
SC (single crochet) joins the panels together and creates the neat finishing border around the entire piece.
-
Backward single crochet adds a decorative final round that gives the edges a polished, professional look.
There’s a lovely rhythm to this project—the repetitive double crochet rounds of the star body let your mind wander while your hands work, and the shaping rows require just enough attention to keep things interesting.
Construction
The sleeping bag is worked in two main panels that are later joined together. Each panel begins with a magic ring and grows outward in double crochet rounds, with two increases per round creating the star points. The instructor demonstrates how each round adds two more double crochet stitches between the chain-two spaces at each point, building the star larger with every round. For the 0–3 month size, you’ll work 14 rounds, while the newborn and 3–6 month sizes use 13 and 15 rounds respectively.
Once the star base is complete, the shaping begins. Working along one edge, you’ll decrease at the beginning and end of each row to create a triangular panel that forms the side of the sleeping bag. The tutorial shows exactly how to work these decreases for a clean, professional finish. The front panel has all five sides decreased, while the back panel keeps five sides intact to form the back of the sleeping bag.
The hat section is worked separately with front post and back post double crochet to create ribbing, then shaped with decreases at both sides and the middle to form a rounded opening for the baby’s head. The sleeves are simple rectangular pieces that are sewn or crocheted into place. Follow the full video tutorial for exact counts and complete pattern details, as the instructor provides specific stitch numbers for each size and demonstrates the joining process step by step.
Beginner Tips
Keep track of your rounds with a stitch marker. The star grows quickly, and it’s easy to lose your place. Place a marker at the beginning of each round so you always know where you are.
Use the chain-three space at the start of each row. The instructor emphasizes this point—working your first double crochet into that space rather than skipping it prevents gaps and gives you a much cleaner edge on your decreasing rows.
Count your stitches at the end of each decrease row. Each row should have two fewer stitches than the one before. Checking as you go saves you from discovering a mistake many rows later.
Choose your buttons carefully. The tutorial recommends buttons around 2 cm that can pass through the crochet fabric without needing a buttonhole. Test your button through a stitch before attaching it to make sure it’s secure but not too tight.
Using Your Star Sleeping Bag
This piece is as practical as it is beautiful. Use it as a cozy cocoon for those early days when baby wants to feel snug and secure, or lay it flat as a play mat or tummy-time blanket. The buttoned sleeves make it easy to get baby in and out, and the star shape adds a touch of whimsy to any nursery. It’s also a thoughtful handmade gift for baby showers—something the new parents will treasure long after the newborn stage has passed.
Keeping Your Star Sleeping Bag Cozy and Clean
Machine wash your sleeping bag on a gentle cycle with cool water and a mild detergent, then lay it flat to dry to preserve its shape. Avoid wringing or twisting the fabric, as this can distort the star points. If you want to block it for a perfectly even finish, mist it lightly with water and pin it into shape on a towel, then let it air dry completely. Store folded in a dry place, and it will be ready to wrap a little one in warmth whenever needed.
Closing: A Personal Invitation
There’s something deeply meaningful about creating handmade items for babies—each stitch carries a little bit of love and hope for the future. I hope this star sleeping bag inspires you to pick up your hook and make something soft and special for someone you love.
If you enjoyed this project, take a look at my other free crochet patterns: {{OTHER_PATTERN_ARTICLES}}. And if you’re just starting out, visit the Guides section, where I’ve collected helpful articles about crochet basics and techniques: {{GUIDES_ARTICLES}}.
Save this Star Baby Sleeping Bag to your Pinterest crochet board so you can come back to it whenever you are ready to start.
Follow us on Pinterest and subscribe to the Newsletter so you don’t miss a thing!
Tutorial and photos of this Star Baby Sleeping Bag by: Craft & Crochet.